

I believe being creative is good for the soul.
It allows us to express ourselves and find an inner peace.Here you will find some free tutorials and patterns for you to enjoy…
Create your own dreamcatcher

I hope you have fun creating your own dreamcatcher.You may want to light some incense and put on some relaxing music before you begin,helping create a calm and peaceful atmosphere to create in…
Remember to enjoy the process of your creation,as with life creativity is as much about enjoying the journey as reaching the destination…
To make your dreamcatcher you will need the following:
1}A hoop,wooden or metal which can be purchased online or in craft shops.Alternatively you can create your own by bending and wrapping willow,ivy vine or hawthorne.
2}A selection of yarns,fabrics torn into strips,ribbons and lace.You can use either a combination of all of them or choose whichever you prefer depending on the look you are going for.
3}Fine cord for the web{hemp cord is good for this},alternatively you could use yarn,embroidery thread or even twine.If you are wanting to add beads to the web ensure you have chose a cord the beads will thread on to.
4}Scissors,needle and thread{optional but useful if you are fabric wrapping the hoop} or a hot glue gun.
{I also have dreamcatcher kits available at http://www.etsy.com/uk/shop/inspiritstitchery if you prefer to work from a ready made kit}…
1} First decide whether you want to fabric wrap the hoop or leave as it is…
2} If you are leaving as is skip the next step and go to step 4
3} If you are covering the hoop you will need either a needle and thread,hot glue gun or sticky tape to hold the fabric/ribbon in place.
Choose a couple of pieces of ribbon or fabric.It is best to use a medium width rather than narrow or wide.
At one end wrap a small piece around the hoop at an angle,with a needle and thread stitch the ribbon in place so it won’t come undone.If using a hot glue gun put a small amount of glue on the hoop and wrap a small amount of one end of the fabric onto the hoop at a slight angle.{Taking care not to burn any fingers!}
Once you are happy that the ribbon is held in place start wrapping the ribbon or fabric around the hoop,keep wrapping it at a slight angle so it moves around the edge of the hoop and is not just overlapping one place.
Keep wrapping tightly until you reach the beginning and either stitch in place again or use the glue gun to secure.
Depending on the size of the hoop you may need either one or two pieces to complete the hoop.
You are now ready to make the web 🙂
4} Choose a place on the hoop to begin your web.{If you have fabric wrapped your hoop you may want to begin at the place you stitched or glued the fabric.This will then be hidden by the trails of ribbons and fabrics at the end}.
Taking the hemp cord,tie to the hoop in a tight knot.{If once you begin making the web you find the hemp cord sliding around the hoop,take a small piece of sticky tape or even a peg and place over the knot and hoop to hold in place whilst you create the first circle of the web}.
Next take the long piece of hemp cord and bring it to a point about 1 and a half – 2 inch further around the hoop.Place it on the top of the hoop and then pass it over to the back of the hoop,bring it through the ‘hole’ you just created.{This stitch is repeated for the rest of the dreamcatcher,so once you get the hang of this bit it is easy!} 🙂
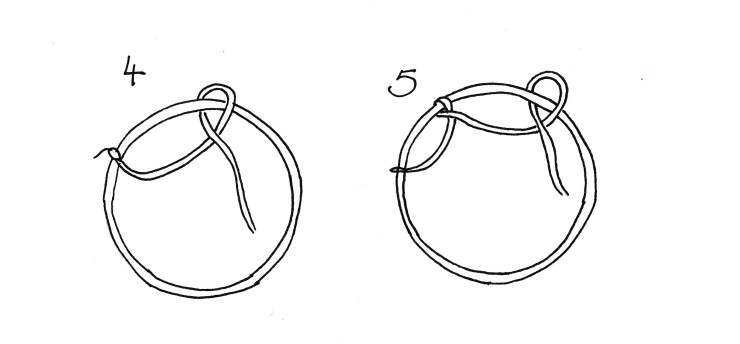
5} Repeat this stitch,keeping the same spacing between stitches and pulling tight as you go along,until you reach near to the where you began.
The last stitch on the first round of the hoop should fall about the half the size spacing of the rest of the stitches on the hoop.
6} So once you have about 1 inch left on the hoop,repeat the same stitch but bring it to the first stitch you created on the hoop,the first round of stitching is now your ‘hoop’ for creating the second row.
This continues for the rest of the web.As you create more rows you may find it more difficult to thread the cord through as the ‘holes’ get smaller.
If you have a large eye darning or tapestry needle you may want to continue using this to create your web.
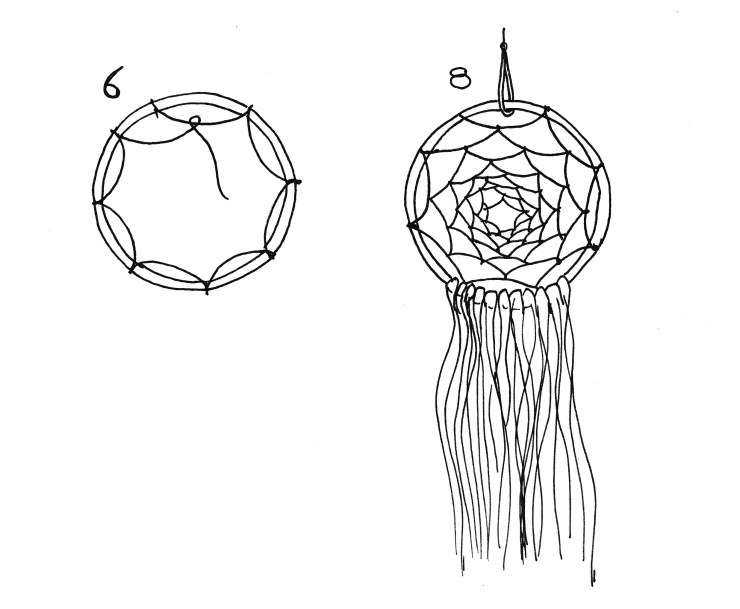
7} You can continue with the web until you have reached the centre,or you may want to leave a hole at the centre,either way once you have finished tie off the hemp cord by creating the stitch in the same place a few times,pulling tight and then cut off any remaining cord ensuring the knot is secure first.
8} Now the web is complete you can begin to decorate by adding the lengths of lace,fabrics or yarn to the bottom edge.
Begin by tying at the centre and then work your way either side of the centre ribbon to keep it even.Trim the ribbons to the length you would like them.
9} Lastly take a piece of the hemp or small piece of yarn or ribbon and make a loop at the top to hang your beautiful dreamcatcher,stand back and admire your work 🙂
You can add anything you like to your dreamcatcher and make it your own personal creation.Try adding artificial flowers,crystals,sea shells,twigs or recycled jewellery for a few ideas.


Blessings,Fiona
*************************************************************************************
Colouring therapy…
I used to love to draw and colour as a child and now as an adult I find i still get the same enjoyment from it.It is not only relaxing but also fun to see the finished piece and have the sense of achievement at having created something yourself.
Try to find a little spare time either daily or weekly to yourself.Switch all technology off,put on some favorite music,light some incense and get lost for a little while in another world,where all you need to do is choose the colours of the pencils or pens you are using and which music to listen to! Heaven! 🙂
Below is one of my colouring pages I designed FREE for you to download,print and colour! 🙂 Just click on the link…
Take your time with the colouring,let your relaxed mind choose the colours and go with the flow.
There is no hurry to complete the picture,creativity is as much about the journey than the destination…

Happy colouring! Blessings,Fiona 🙂
